How to deploy a machine learninig model
In this blogpost I will show you how to first create a simple Random Forest Classifier and then build an API with Flask. Let's start by building the model.
import numpy as np
import pandas as pd
from pathlib import Path
import pickle

from sklearn.ensemble import RandomForestClassifier
from sklearn.preprocessing import StandardScaler
from sklearn.model_selection import train_test_split
p = Path('/notebooks/storage/data/Titanic')
df = pd.read_csv(f'{p}/train/train.csv', index_col=0)
df.tail(5)
What we want to predict is whether the Passenger has survived or not. We want a simple model, so let's only keep the following variables:
to_keep = ['Survived', 'Pclass', 'Sex', 'Age', 'Parch']
final_df = df.reset_index()[to_keep]
final_df.dtypes
final_df['Sex'] = np.where(final_df['Sex']=='male', 0, 1)
final_df.head()
Now that we've created our final dataframe, let's train the model.
First, we define the accuracy metric to see how our model is doing:
def accu(pred,y, threshold=0.5): return (np.round(pred-threshold+0.5) == y).mean()
def m_accu(m, xs, y): return np.round(accu(m.predict(xs), y), 3)
We then standardize our data, in this case only the age variable.
final_df = final_df.fillna(0)
scaler = StandardScaler()
final_df['Age'] = scaler.fit_transform(final_df['Age'].values.reshape(-1, 1))
Then we define the model:
def rf(xs, y, n_estimators=40, max_samples=500,
       max_features=0.5, min_samples_leaf=5, **kwargs):
    return RandomForestClassifier(n_jobs=-1, n_estimators=n_estimators,
        max_samples=max_samples, max_features=max_features,
        min_samples_leaf=min_samples_leaf, oob_score=True).fit(xs, y)
Then we split the data into train and validation.
col_names = ['Pclass', 'Sex', 'Age', 'Parch']
dep_var = 'Survived'
xs, xs_valid, y, y_valid = train_test_split(final_df[col_names], final_df[dep_var], test_size=0.33, random_state=42)
And finally let's train the model:
m = rf(xs, y);
m_accu(m, xs, y), m_accu(m, xs_valid, y_valid)
from sklearn.metrics import confusion_matrix
confusion_matrix(y_valid, np.round(m.predict(xs_valid)))
I guess that looks ok, so I will save the final model together with the standardizer.
def save_obj(obj, name ):
    with open(f'{name}.pkl', 'wb') as f:
        pickle.dump(obj, f)

def load_obj(name ):
    with open(f'{name}.pkl', 'rb') as f:
        return pickle.load(f)
filename = 'Flask_App/app/final_model.pkl'
pickle.dump(m, open(filename, 'wb'))
save_obj(scaler, 'Flask_App/app/standardizer')
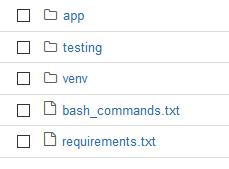
Now that we have our model we want to build an API. We will use Flask for this. This is how the folder structure should look like:
For our Flask App to run we need our terminal. Here are the bash commands you need to run to set up Flask:
python3 -m venv venv \ . venv/bin/activate \ pip install Flask \ pip install pandas numpy sklearn requests \ pip freeze > requirements.txt \ cd app \ export FLASK_APP=main.py \ export FLASK_ENV=development \ flask run
In our folder we create a virtual environment which I called venv. I then activate it an install Flask and some other packages we need to make our RF-Model work. I then save the requirements into a txt file. I go into the app folder, set the Flask App to main.py and the environment to development. Finally, I start flask. The output should look like this:
Next, we need to define a main.py and a utils.py. Let's start with the utils.py
With our API we want to send a GET request with values for our variables:
Pclass = 1
Age = 22.0
Sex = 0
Parch = 1

# load trained model and standardizer
PATH = "final_model.pkl"

loaded_model = pickle.load(open(PATH, 'rb'))

standardizer = load_obj('standardizer')

# create dataframe from input data
df = pd.DataFrame({'Pclass': [Pclass], 'Age': [Age], 'Sex':[Sex], 'Parch':[Parch]})

# define transform function
def transform_data(raw_data):
    raw_data = raw_data.fillna(0)
    raw_data['Age'] = standardizer.transform(raw_data['Age'].values.reshape(-1, 1))
    return raw_data

# define prediction function
def get_prediction(transformed_data):
    pred = loaded_model.predict_proba(transformed_data)
    return pred
Does it work?
get_prediction(transform_data(df))
Awesome! So our utils.py works, let's build our main.py.
from flask import Flask, request, jsonify
import csv
import pandas as pd

from utils import transform_data, get_prediction

app = Flask(__name__)

@app.route('/predict', methods=["GET"])
def predict():
    if request.method == 'GET':
        Pclass = request.args.get('Pclass')
        Age = request.args.get('Age')
        Sex = request.args.get('Sex')
        Parch = request.args.get('Parch')
        df = pd.DataFrame({'Pclass': [Pclass], 'Age': [Age], 'Sex':[Sex], 'Parch':[Parch]})
        transf_data = transform_data(raw_data)
        prediction = get_prediction(transf_data)
        prediction = prediction[0][1].item()
        # We take the first value of our predictions, representing the probability to survive.
        data = {'prediction': prediction}
        return jsonify(data)
    else:
        return jsonify({'error': 'Only GET requests possible'})
What this does is the following: it reads the data from the GET request, uses the utils.py for transform_data and get_predictions and returns the prediction for surviving.
Finally, we want to check our app. We build a test.py file where we send data to our "server", which will return a result. This is how the test.py file looks like:
import requests

# https://your-heroku-app-name.herokuapp.com/predict
# http://localhost:5000/predict

data = {'Pclass': 1, 'Age': 22.0, 'Sex': 0, 'Parch': 1}
r = requests.get("http://localhost:5000/predict", params=data)
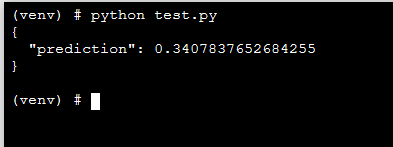
Let's use our terminal to see whether our API is working.
Awesome! We built a Flask App to deploy our machine learning model and made it available as an API.
Stay tuned for the next blogpost! \ Lasse


